
What is Zoho Creator | The Basics| Design & Share Custom Forms |Using prevalidated Form Fields | Statless Forms | Unique values in List | HTML views |
We all know that Telephone / Zip codes are NUMBERS isnt it (Genius eh!). But, when we typically use the Number-field type in the Zoho form, the end user tends to enter something like this

But, as the Form Field is of Number type, the system fails to recognize the special characters ( parenthesis (), – hyphen etc) and understands the value to be Null
ie, According to the system, an number field which does not exclusively contain numerals are invalid — Well, thats how its supposed to be isnt it?. okay, the what happens with INVALID DATA ? .. ofcourse it gets rejected ( Again, a No Brainer.. isnt it?)
Well then, how to make sure irrespective of whatever format the user enters, the data gets added on to the system in the right format? For this, we can use a combination of field types & Custom Actions.
SCENARIO :- ALLOW USER TO ENTER THE TELEPHONE NUMBER IN WHATEVER FORMAT HE WISHES TO ENTER
GOAL :- CONVERT THE ENTERED TEXT INTO AN ALL NUMERALS ONLY FORMAT
Demo Here
Lets design the Form ( 2.jpeg)

Lets write a custom action to get this going

Now, lets call this function inside the form
For me, this is the sequence

Once, this is done,
Go to the Live Mode & Validate
Your appreciation is my motivation
What is Zoho Creator | The Basics| Design & Share Custom Forms |Using prevalidated Form Fields | Statless Forms | Unique values in List | HTML views |
Zoho Creator Tutorial – Custom Dashboard using HTML views
What is Zoho Creator | The Basics| Design & Share Custom Forms |Using prevalidated Form Fields | Statless Forms | Unique values in List |
We have been experimenting with forms & views in zoho creator. Now you must have quite a few forms & views which when put together make a fine application. Did you know that you can create custom dashboards using HTML views in Zoho Creator?
HTML views are nothing but blank HTML pages into which you can insert your form’s field variables. So they make excellent dashboards, presenting dynamic reports based on user selected criteria, so on and so forth.
To give you a peek into which what HTML views are capable of doing, take a look at the demo. Eg:- you will be greeted with your username at zoho. This is achieved by using the <%zohologinuser%> tag. If you explore the fetch records & collection variables, you will be able to see the dynamic nature of these Html views.
The application, displays the dashboard by default. This is done by using the various options under the customise menu. Create a hidden section and place master views to hide them from display.
HTML views support all HTML tags. In the dashboard I have inserted images, and also included the HTML view from my private application. You can also insert forms / views directly using the Form- View snippet, or use the IFrame to embed permalink of your forms & views. I have a zoho creator form embedded in another html view called Request a Tutorial. ( Home tab – drop down)
The above form is located within my private application. I am using the “Embed without login” iframe snippet code to display in the html page. So, the data submitted will go to my private application & will not be available for all to see.
Next Week’s post – How to set up your custom bulk mail options using zoho creator Your appreciation is my motivation
What is Zoho Creator | The Basics| Design & Share Custom Forms |Using prevalidated Form Fields | Statless Forms | Unique values in List |
Zoho Creator Tutorial – Unique list values, dynamic pick lists & dependent list values
What is Zoho Creator | The Basics| Design & Share Custom Forms |Using prevalidated Form Fields | Statless Forms |
Now that you are exploring zoho creator yourself, you might have grasped more than what you bargained for. During this learning curve you may come across certain use-case scenarios & would like to see them work. Here is a working copy of one such request that visited my inbox.
UPDATE: Oct 2011
After the introduction of Aggregate Records, by ZC displaying unique list got even simpler.
Using the same example as below, lets display distinct list of countries using this option.
- Use a Dropdown field element in your form and name it – Distinct Country list
- In the Script section > Form > On Add > On Load
- Under Data Access> Aggregate Records > Drag and drop into the code builder

- Drag and drop “Add item” element into the code builder
- Select the drop down list element “Distinct Country list” — From Step 1
- Select the Countrylist-variable — from Step 4 (Aggregate record screenshot)
- Save script, and check in live mode if the distinct list is displayed in your form

The Assignment :-
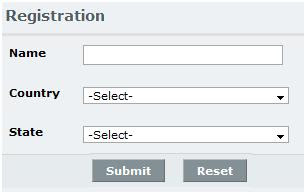
- Registration form has Country & State fields.
- Both have to be pre-populated drop down fields ( ie… zero manual entry. User has to pick from list.
- >Based on the Country name, (Pre-populated list), the State Names ( of respective country) should be displayed in the second drop down.
Click here to View the Working demo ( Tab Name – LIST ACTIONS)
Forms & views Used –
Counry_states Form ( & view) – Single line field
Registration Form ( & view) – Single Line & Drop down
| Registration Form | Country – Sates (add new country & state list here) |
 |
 |
Use Single line fields and Drop down fields to design the forms. Leave the default “Option1, Option2, Option3” in the drop down fields. We will be dealing with them shortly at Deluge script.
Donot use pick list/ lookup field
Question:-What happens when you use a look-up field?
Answer:- It will show the country names as “n” occurances. Eg:- India, India, India, India, USA ,USA, USA, USA.
We don’t want that.. all we want the list to show is – “India”& “USA”
In other words, we want to avoid any duplicate entries in the drop down list.
Form:- Country_States
This form is used to “collect” the country name & state name. So there is absolutely no scripting involved. Do take a look at the Country States View in the DEMO link
Form:- Registration Form
You can have as many fields as you want. Since this is a tutorial post, I am limiting the fields to Name, Country & State
In the demo, you will notice that, “Country” – does not have duplicates & “State” list changes dynamically based on the country name.
The Deluge Script involved.
On Registration Form — > > on Load.
//——–THIS POPULATES THE COUNTRY LIST WITH UNIQUE VALUES——–
Country_list = List();
Cntry = Country_states [(Country is not null)];
Country_list.addall(Cntry.Country.getall());
Country_unique = List();
for each country in Country_list
{
if (!Country_unique.contains(country))
{
Country_unique.add(country);
}
}
for each Ctry in Country_unique
{
County:ui.add(Ctry); //USE CLIENT FUNCTION — ADD ITEM
}
| CODE | YOU CAN FIND THIS AT | THIS LINE OF CODE MEANS |
| Country_list = List(); | LIST MANIPULATION (LM) – CREATE LIST | |
| Cntry = Country_states [(Country is not null)]; | DATA ACCESS – FETCH RECORDS | collect the rows where state is not null in Country_States_view |
| Country_list.addall(Cntry.Country.getall()); | LM- ADD ALL |  |
| Country_list=List(); | LM – CREATE LIST | |
| for each country in Country_list | LM – FOR EACH ELEMENT <expression> = country |
|
| if (!Country_unique.contains(country)) | IF CONDITION | You can otherwise Type —> country_unique.contains ( country) is false Checks if the <expression> value is present ( true) or not ( false) |
| Country_unique.add(country); | LM – ADD ITEM | If false, then the value is added to the list — now, you have a unique list |
| for each Ctry in Country_unique | LM – FOR EACH ELEMENT <expression> = ctry |
|
| County:ui.add(Ctry); | CLIENT FUNCTION – ADD ITEM | Now, each list item is added to your drop down box |
On Registration form – > Country Drop down – > User Input
//——THIS POPULATES THE ~~STATES~~ OF THE SELECTED COUNTRY———–
States_list = List();
States_rec = Country_states [Country == input.County];
States_list.addall(States_rec.State.getall());
for each State in States_list
{
State:ui.add(input.State);
}
//——THIS POPULATES THE ~~STATES~~ OF THE SELECTED COUNTRY———–
States_list = List();
States_rec = Country_states [Country == input.County];
States_list.addall(States_rec.State.getall());
for each State in States_list
{
State:ui.add(input.State);
}
| CODE | YOU CAN FIND THIS AT | THIS LINE OF CODE MEANS |
| States_list = List(); | LM – CREATE LIST | |
| States_rec = Country_states [Country == input.County]; | DATA ACCESS – FETCH RECORDS | |
| States_list.addall(States_rec.State.getall()); | LM – ADD ALL | Exactly similar to Above pic – Enlarge and see. Be sure to get the state names & check the box for return field values as list |
| for each State in States_list | LM – FOR EACH ELEMENT <expression> = State |
|
| State:ui.add(input.State); | CLIENT FUNCTION – ADD ITEM | Select the state-drop down list — You will see this list getting popupated based on country name |
UPDATE: Oct 2011
After the introduction of Aggregate Records, by ZC displaying unique list got even simpler.
If you found this post to be of some use, please spare a moment to drop a comment.
Your appreciation is my motivation
What is Zoho Creator | The Basics| Design & Share Custom Forms |Using prevalidated Form Fields | Statless Forms |
Zoho Creator Tutorial – Stateless Forms ( Use multiple forms to update a single table)
What is Zoho Creator | The Basics| Design & Share Custom Forms |Using prevalidated Form Fields | Statless Forms |
With the basics in place, I guess, now its time for us to look into some of the advanced features that you can implement within Zoho Creator application.i.e you can come up with more customizations based on your requirements. This will be a combination of form’s design & a little more Deluge script that usual.
The Assignment :-
Application Name :- Event Management
Forms used :
- Master Form _Event Management (Stores data in Master View)
- Event Details Form (Stateless Form)
- Contact Details Form (Stateless Form)
Click to View Demo
This Event Management Application has the details of a particular event & the contact info of the person who is responsible for this event. I hope you would remember me saying in my earlier posts that, by default, Zoho Creator stores the data entered into the forms in tables, called as Views.
However, Zoho Creator has another set of forms called the Stateless Forms. i.e. the data entered within these forms, will not be saved. ( — what the heck! , what is the purpose of having a form that does not save data — , Hey! Friend, hold your horses. You will soon find out.)
As the name suggests, anything entered into the master form will be stored in its View. Stateless forms merely pulls the data from the master form & displays it for you to edit & confirm the edits. After doing the edits, when you go back to the main form’s View, you will notice that the edits have been implemented in the master-view as well. Sample Application here
The fields we will be using will be as follows
Master Form’s details
This is a regular form, Created the normal way. Forgot,see here
Event_Contact_ID*
Contact_Name – This is a required field
Contact_email
Contact_Phone
Event_Name – This is a required field
Event_Venue
Event_Date
Stateless Form (Stateless forms are those, whose data are not stored in Zoho Creator.)
It is a single choice that eventually decides if a form is stateless or not.
Form Fields :-
Event Details Form (Stateless Form)
Event_Contact_ID* — > This will be a look-up field.
Event_Name
Event_Venue
Event_Date
Contact Form (Stateless Form)
Event_Contact_ID –> This will be a look up field
Contact_Name
Contact_email
Contact_Phone
Using the look up field to “show data from other forms”

Remember to include the “SUBMIT” button in your stateless forms
The Tricky part – Deluge Scripting
Master form :-
The EventContact_ID* is the most important field, because, this links all the 3 forms in this application. Hence this has to be unique. We will be generating this UniqueID using deluge script.That means, the user is not allowed to enter anything in this field. Which in turn means, go back to your Master form – Edit the field for Event Contact ID , and say – Hide this field to others. ( of course, “you” will still see it).
Deluge Script to generate the Event Contact ID.
Master Details Form –> On Add –> On Success –> Set Variable

Don’t forget to save the script.
Now run your application & enter some data into the master form.
Go to Master view and cross verify if the data is getting saved along with the auto-generated “Event Contact ID”
Verify your “Lookup field” in “Event details form” & “Contact details form”.
If you had set up the look up field for “Event Contact ID” correctly (in the stateless forms), you should be able to see all od the Event Contact ID’s in this drop down list. Nothing will happen yet, just run both forms & see if the values are shown in live mode.
Deluge script to “Call the data” from the master view.
Up until now, you had been using the “Set Variable” in the script. Now, in order to “call the data”, we will be using “Fetch Records” feature. So what happens with this option. . .
You “Fetch Record – data “ from a certain View & Store it in a variable. This variable is now becomes a “Collection-variable” , (User Defined collection, to be more precise) ie .. Collection of data from field 1, field 2, field 3.. So on and so forth.
Question:- when to fetch the record – data ?
Answer :- After the user selects the value from the “look up field”
Stateless Form (Event Details / Contact Details forms ) —> EventContactID (Lookup field)– >On User Input –>Drag drop “Fetch Records”—>Edit

Now that you have “Fetched the record data”, its time to show them in the form. Use Set variable to achieve this.
input.EventName = RecData.EventName;
input.EventVenue = RecData.EventVenue;
input.EventDate = RecData.EventDate;
input.EventVenue = RecData.EventVenue;
input.EventDate = RecData.EventDate;

Repeat the same exersise at Contact Details form
Contact Details Form –> Event Contact ID (Lookup field)–>User input–>
RecData = MasterDetails_EventManagement [EventContact_ID == input.EventContact_ID];
RecData = MasterDetails_EventManagement [EventContact_ID == input.EventContact_ID];
input.ContactName = RecData.ContactName;
input.ContactPhone = RecData.ContactPhone;
input.Contactemail = RecData.Contactemail;
Deluge script to rewrite the entry in the master view ( table)
Now, you should be able to see relevant records in the stateless form based on the value from the Event Contact ID list. Next step would be to edit other details & Submit the (Stateless) form. This should inturn update the details in the master view.
Question:- when to update the record in master view
Answer :- After the submit button is clicked.
Answer :- After the submit button is clicked.
Deluge Script code will be :-
Stateless Form ( Event details / Contact details)–> Submit Button –> On Click
RecData = MasterDetails_EventManagement [EventContact_ID == input.EventContact_ID]; //Use Fetch Records , to call the record data
RecData.ContactName = input.ContactName; //For these, use Update Records
RecData.ContactPhone = input.ContactPhone;
RecData.Contactemail = input.Contactemail;
Reload;

Repeat the same excersie in Contact Details Form ( Stateless Form)
Submit Button –> OnClick
RecData = MasterDetails_EventManagement [EventContact_ID == input.EventContact_ID]; //Use Fetch Records , to call the record data
RecData.ContactName = input.ContactName; // use Update Records
RecData.ContactPhone = input.ContactPhone;
RecData.Contactemail = input.Contactemail;
Reload;
Run the application & let me know if you are able to update the master field from the stateless forms. Not happening.. Feel free to drop a word to me. We will figure it out together. Chao =;
Your appreciation is my motivation
What is Zoho Creator | The Basics| Design & Share Custom Forms |Using prevalidated Form Fields | Statless Forms |
Zoho Creator Tutorial – Part 5 Introducing Deluge Script
What is Zoho Creator | The Basics| Design & Share Custom Forms |Using prevalidated Form Fields | | Deluge Script – Basics
Now that you are familiar with the basics of zoho creator, lets dig our hands into their deluge scripting. During the time when we were working on my Visual Basic application & Java applets, each one of us would have our own way of locating a specific piece of code that we might want to use in our application.
However, with zoho creator’s deluge script, it doesn’t mater a even haven’t programmed anything beyond your TV for the various channels. Because, they have made programming as simple as drag and drop. How,..?. Read along.
Know where to write the code.

As of now, lets concentrate on the SCRIPT –> FORMS
As we move on to views & Functions, we will be looking at other tabs
You can use the drop down arrow to choose any form within your application.
As we developing our guest book, we will open the Guest Bool – FORM in the script tab. After this you should be seeing this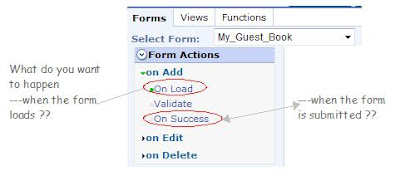
Here, the script does what it exactly says just there. For our application’s sake, let us Add code to AUTOMATICALLY ADD THE DATE within the date field , so that the users dont have to type / select the date. Further, it would also help to know who visited when.I have already added the code in FORM –> LOAD , which is why you see a green dot ín the above pic.
What to write / How to write ‘code’ ?
(A) You might want to say “When the form loads”
— Translated, you will have to write the code on Form –> On Add –> On Load.
— If you clicked in the same order, you should be seeing this. Use the prev image and the one below to locate

(B) You might want to say “ Add todays date automatically ”
— Translating , this would mean something like this
i.Set the Date-Field
ii.To Todays Date
— So you should be doing this
- Scroll down a bit and locate the SET VARIABLE. ( Use the image below for guidance
- Drag and drop it on to the coding area.
- As soon as you drop it, & if you hover the mouse, you should be seeing an EDIT &
- DELETE button.
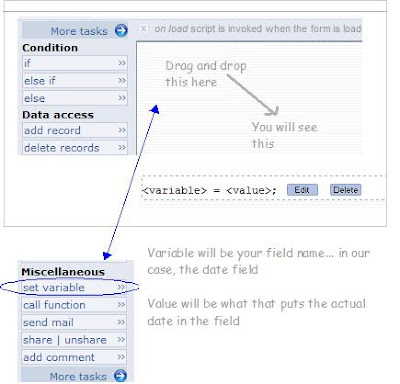
(C).How to set the value for the date field. ?
As soon as you click on Edit, you will be presented with a dialog box
Notice that the declare variable is a drop down variable. – From this select the Date field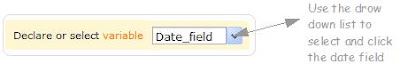
As for the actual value , we will be using a variable called the ZOHO – currentdate It is as simple as saying x = 5. You will be telling your application that every time the form loads, just give the current date’s value to my date field. For this, you will have to
1. Select the ZOHO VARIABLES ( Tab)
2. Scroll down a bit .. until you locate the zoho.current date.
3. Click DONE – & you will see this 
Wait !!! — The code is not saved yet, It is only generated – So you will have to scroll down and click SAVE SCRIPT at the right bottom corner You will see a green band that says, Script modified.
Now you are ready to go.
Access your application – psst !! … Use the Acess thisApplication Link at the top.
Do you see the date automatically coming up in the date field … ? Great .. You have successfully Coded your application
Now, I have a practice assignment for you. After the form loads & zoho’s current date is performed, disable the date field.
Now that every step has been demonstrated with screen shots, I shall be providing only guidelines. You will have to look for them in the order specified. It is just that…I am feeling lazy to do the screen shots again ..
How to do this ?: –
Form –> On Load –> Drag and drop –> Disable field –> Select Disable – option –> select date field –> Done
Save Script
How to check this ? –> Acess the application — > You should not be able to change the date manually.
Your appreciation is my motivation
What is Zoho Creator | The Basics| Design & Share Custom Forms |Using prevalidated Form Fields | | Deluge Script – Basics
Zoho Creator Tutorial – Part 4 ( premade Form Fields , Zoho Creator does the validation for you)
What is Zoho Creator | The Basics| Design & Share Custom Forms |Using prevalidated Form Fields |
If you had been following this tutorial closely, you should be able to perform the following based on last week’s post,
- Create a new form
- You should be able to design your form.
- Add fields that are relevant to you.
- Rename the fields for display and scripting
- Embed the form within the blog website ( Hint : -Form’s Live mode – More ction – Embed in website – Access without login – Get code – paste in your blog )
I guess you would also remember me telling that Zoho Creator has provided with ready to use fields based on their data types.
| Field types | Can be used for They are all so self explanatory, I am just listing them here. | |
| Single line | Names , one liners up to around 300 characters. | |
| Multiline | As the name suggests, can be used to get “paragraph” type info from your readers / clients. | |
| Eveything is automatically validated. Incorrect entries will not be accepted by the system. Take it from me, this kind of validation used to be a grind, but not
anymore |
||
| Url | ||
| 123 Number | ||
| 0.1 Decimal | ||
| % Percent | ||
| $ Currency | Set the currency type ( USD / INR / YEN.. etc. Pick the one that suits you) | |
| Drop Down | Here you can give a custom set of values of your choice. | |
| Radio / Option buttons | You can provide any number of options, but only one will be selectable by the user Eg: Male / Female |
|
| Check box | This comes handy when you have multiple options & the use also need to select more than one from what you have provided EG : A Person can like Red , Blue & Green |
|
| Multi Select | This is more like a list box, from where the person can click and select You can choose to display the list sorted out in alphabetical order |
|
| Date | ||
| Date – Time | Gives you a timestap along with the date | |
| Look up ( also called as Pick List) | This allows you to call data from one form into another form. (We will be dealing with this shortly.) | |
| Formula | This computes values for you based on the values on other fields. Eg: Formula will do MathScore + ScienceScore , where in MathScore & ScienceScore are numeric fields . All you have to do is give the fieldnames & + operator Advaced computations are made easy by the formula fields |
|
| Image | You can actually collect images without the fear of overloading your inbox. You can as for the URL / Alternate Text / Source etc all using the zoho creator form.
Plus you also know who submitted what and when .. if you would add the date & Name field to such a form |
|
| File Upload | This can be used to gather any file type. Automatically gives the browse button so that reader can upload from their system. | |
| Add Notes | Use this as sticky notes, something that you want your viewers to know. ( notice the welcome text in the form below) | |
| Decision Box | This can have only one answer YES / NO Most commonly used as disclaimers. |
I have modified the guest book forms and placed the code here. You might notice that some fields have a * attached to them. This means these are mandatory or compulsory fields. If you try to submit the form using blank data for these fields, then the submission will be not processed. This is catch those wary visitors who are not attentive enough
How to Set up compulsory fields
- As soon as you place a field by click and Drag ( or) Edit a certain field
- Click on Options
- Notice the check box that says “This is a required field” – Click it
The field becomes compulsory.
Similarly you can set up if you want to have a Hidden field / Disallow duplicate enties. I have embedded my guest book form above. Feel free to come up with your own version of your guest book & give me your link. I shall surely drop by and will be glad to see your progress Your appreciation is my motivation
What is Zoho Creator | The Basics| Design & Share Custom Forms |Using prevalidated Form Fields |
Zoho Creator Tutorial – Part 3 ( Design & Share Custom Forms)
What is Zoho Creator | The Basics | Design & Share Custom Forms
Be the real world, or the virtual world, have you ever wondered how prominent forms are? The very act of handing over a form translates into to some kind of “organised” activity. (How organised is it really… is a subject of debate). What is the first thing you do when you get connected to the internet ? … Of Course!, check the mail ( what a dumb question .. isn’t it ?). But hey !, wait there is much more between that. As soon as you connect to the internet, you open your browser ( IE / FF / Safari / Opera). Then you view your signing in page for the mail. Now STOP!. What do you see… A FORM that asks for your UserID and Pwd. It is only after this you get to reach your inbox. So you see, there is no escaping from Forms. If you intend to collect data , then you need an interface to collect them. Forms provide just this. So, gear up to design your custom form.
Designing the form using Zoho Creator :-
Remember :-
- Forms accept data & Views display the data
- Both above actions happen only in live mode.
- Designing Forms takes place in edit mode.
As soon as you login at zoho Creator, you will be greeted by your dashboard which lists all your applications.
Zoho Creator not only allows you to create your custom forms, but also reduces the work load by providing ready-to-use fields for specific data types.
Say, the 123Number field-type will only accept numbers. Any Text will be rejected by the system (without you having to write code to validate.)
Earlier, there was just one field NAME. Now lets customise the guest book form with some basic elements.
Feel free to explore the possibility of using other field types such as Radio – for Male / Female , ADD NOTES – to have a standard piece of text by way of explanation etc etc.
If you wish to edit the existing fields ( Change NAME –> To –> YOUR NAME )
Another EDIT EXERCISE: – Edit the Blog URL field & Remove the tick mark from “Link name required”.

We have experienced those moments of ” OMG! .. I Forgot to Save”. Not anymore. Coz, zoho creator does it for you without having to click on any “SAVE Button”. ( … actually… you wont find any save button).
Once you are satisfied with you form’s design, fields etc, go to the live mode using the ACCESS THIS APPLICATION link.
- Go the form in Live mode
- Add few data and submit the form
- Locate the view for this form ( don’t remember how, Read again )
- Confirm if all the data you have entered are seen
Now that you have designed the form & have tested it, it is time to test it in real time.
How to put Zoho creator form in Webpage / blog ?
Once you are in the live mode of the form, notice the More actions link at the top of the form & follow 1 & 2 as directed below

It is wise to share the forms using the url that is generated after Access form without login. Use the code and paste it in your blog.
You can use the HTML/Javascript element & paste code. If you want the form to appear right inside the post, then write a new post, and paste the code snippet in the EDIT HTML mode of the post.
Invite your friends to sign your guest book. See your form in action.
If you have any problem, drop me a word, I shall be glad to help.Your appreciation is my motivation Thanks in advance for linking to me at your blog.
What is Zoho Creator | The Basics | Design & Share Custom Forms
Zoho Creator Tutorial – Part 2 (The Basics)
What is Zoho Creator | The Basics | Design & Share Custom Forms
Welcome back ! I believe that by now, you would have your zoho creator login so as to proceed further. I will not be surprised if some of you have already started to explore its interface, get to know the workspace etc. Way to go !..
So, lets start from the beginning. As I have mentioned in my previous post, Zoho creator allows you to create forms & store the data obtained via these forms, and also do scores of other things. Before we start on those, it is essential to know the elements associated with zoho creator. This is get used to the terminologies. But before you start, open up Zoho Creator and login with your User ID and Pwd in another tab / window.
Applications :-
It is much easier to realate Zoho Creator Applications as Excel work books. Understand that you are allowed to create only 10 Applications (~workbooks~ notice the red bar on the top that says this) with free membership. However, with paid membership, you can have unlimited applications. From what I have seen, 10 applications are more than sufficient for individuals and small business owners.
Inorder to create an application, use the Create New Application link in your dashboard.

Lets start off by naming it as “My Personal Application”. As we progress with this zoho creator series, we will be using this application to add forms and do other stuff.
Zoho creator allows you to create 10 applications for free. Please lend me one, during the course of this zoho creaor series.
Forms :-
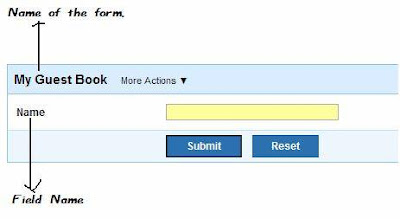
After creating the application , you will be automatically redirected to the My Guest book – form area where you can design your form. Although we will be seeing this in details in the upcoming posts, lets start of with a single field.
Do you notice the INSERT FIELDS in the left & Drag and Drop fields on the right. … So it would be appropriate to say here that You are in the EDIT MODE of the form.
Add a single line field , & give the Label Name as NAME
For the moment, lets have only one field . We will be adding more fields in the upcoming posts.
Live Mode :- (Run the form)
From here, things begin to get technical. There is no need to get perturbed, you will get used to it in course of time.Now, you have your first form ( with a single field NAME).It is time to use this form to gather date.
Use the ACCESS THIS APPLICATION link in the top to go into the LIVE MODE.This will take you to the LIVE MODE where data is entered into the form.
Go ahead, Enter a few names and click submit. AS soon as you Submit the form, you should notice a message that says “Data added successfully”.
Views :- Where does all the data go ?
Zoho creator uses “VIEWS” to strore the data collected via forms. Views are nothing but tables that are automatically populated with data is added to a form.
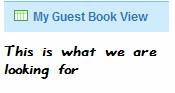 Every form by default has its view. The name is usually [FORM-NAME] & View. Just as in this case “My Guest book View”. The View displays the data only on Live Mode. In the upcoming posts, we will be learning more about how views behave in the edit mode.
Now, that you have located your form’s View, Go ahead and click it. You should be presented with something that looks like this

Lessons Learnt :-
- Create a new application & name it as “My Personal Application”.
- Create a new form & name it “My Guest book”.
- Add a single line field to above form and name it “NAME” — This happens in the edit mode of the form
- Use the ACESS THIS APPLICATION link to go into the LIVE MODE
- Add data into the form and click submit… “Data submitted successfully” confirms the submission
- Locate the view that is autogenerated for the form , It is named as “[ FORM NAME ] & View”
- See the data entered via form in a tabular format.
Things to Remember.
- Zoho allows 10 free applications
- One application can have any number of forms.
- Data can be entered only in Live mode
- Entered Data can be seen only Live mode …. Use VIEWs for seeing the data.
- You can also Add / edit / delete data from the views directly.
It might take a while for the information here to sink it. If you feel overwhelmed, take a break and come back again. I assure you, once you get the hang of things, it will be next to impossible to let go. Your time will be worth every second while you aclamatise yourself with zoho creator.
Feel free to share your thoughts, I shall be gald to respond.
Your appreciation is my motivation
What is Zoho Creator | The Basics | Design & Share Custom Forms
Zoho Creator Tutoral Series – Coming Up
I hope you remember my earlier post 5 months back, Zoho Creator :- Only intuition, no programming. (You couldn’t have missed it, coz I didn’t really post anything after that). As promised, I am here again with the intention having a zoho creator series for all those who are not afraid to try.
Not all are programming experts and not every one can say the difference between relative fields and relational databases I get confused more than i am credited for .. thats the way it is . So, this is for the common man, who can read write and understand English. You see.. Zoho creator is in english & I am blogging about it in english…Oh!.. btw, they have a Japanese version of the sitetoo.. but “iie – arigato gozaimus” .. I don’t speak anymore than this in Japanese.
The idea is to walk you through the process of building an application using zoho creator from scratch.
Walk with me.. let me know if I can be of assistance.
Zoho Creator – What is that ?
Before I answer this question, tell me how extensively do u use MS Excel?. The reason I ask is, a layman’s concept with zoho creator is somewhat based on based on this. Hmm.. lets see… the rows and columns reduce half the work load. The auto filter in excel allows you to sort / organise your data. Perhaps you are even familiar with using formulas ( basic math – to – advanced formulas). Lets say we have an excel sheet like this & call it Guestbook.
| Date | Name | BlogUrl | Comments | |
But, if you want to gather data using excel, then you would have mail it as an attachment ,OR share it as excel sheet with other users using some file sharing platform. This will work great, if you know who is going to use them. Plus, you have to be sure that the people who are using this excel are within your network and trustworthy… That is to say, the “data is private among trusted users ” & “there is no way to gather data outside this small network of friends”…
So, ….Are you with me so far ????..
Now, think about this. You have a Form & this form reflect the “structure” of the YOUR excel sheet.
This has all the elements that you want the user to add. Yet, none of them can see the actual data. Now, this is your “web form” that you have customised to suit your needs. So what happens next, You can either embed this form within your website As Shown above , or share the permalinks of the form via email. (There is more to sharing.. .lessons follow…)
What zoho creator does is to “allow you to create forms” using their WYSIWYG editor. (.. lessons follow..) And, this also allows you to view / edit the data collected via these forms at Zoho Creator. ( .. lessons follow…)
In short – Zoho creator allows you to build custom database application using WYSIWYG editor.But, inorder to start, you need to Signup with Zoho Creator. So go ahead, Register yourself and get a login, You may also signin wiht your Google Account.
Thats pretty much for the introduction,
See you soon with your login at zoho creator.
Your appreciation is my motivation