Zoho Creator Tutorial – Unique list values, dynamic pick lists & dependent list values

What is Zoho Creator | The Basics| Design & Share Custom Forms |Using prevalidated Form Fields | Statless Forms |
Now that you are exploring zoho creator yourself, you might have grasped more than what you bargained for. During this learning curve you may come across certain use-case scenarios & would like to see them work. Here is a working copy of one such request that visited my inbox.
UPDATE: Oct 2011
After the introduction of Aggregate Records, by ZC displaying unique list got even simpler.
Using the same example as below, lets display distinct list of countries using this option.

  1. Use a Dropdown field element in your form and name it – Distinct Country list
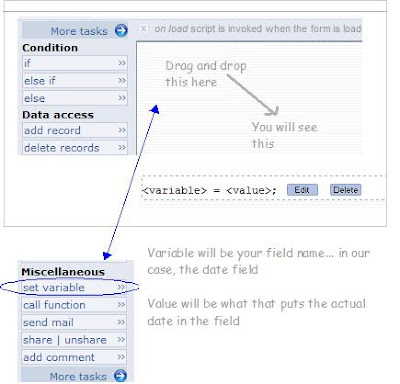
  2. In the Script section > Form > On Add > On Load
  3. Under Data Access> Aggregate Records > Drag and drop into the code builder
  4. Drag and drop “Add item” element into the code builder
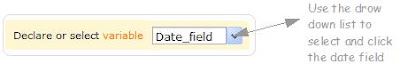
  5. Select the drop down list element “Distinct Country list” — From Step 1
  6. Select the Countrylist-variable — from Step 4 (Aggregate record screenshot)
  7. Save script, and check in live mode if the distinct list is displayed in your form

The Assignment :-

  1. Registration form has Country & State fields.
  2. Both have to be pre-populated drop down fields ( ie… zero manual entry. User has to pick from list.
  3. >Based on the Country name, (Pre-populated list), the State Names ( of respective country) should be displayed in the second drop down.

Click here to View the Working demo ( Tab Name – LIST ACTIONS)

Forms & views Used –
Counry_states Form ( & view) – Single line field
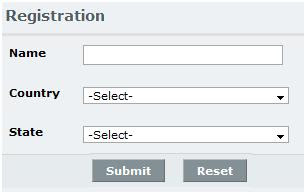
Registration Form ( & view) – Single Line & Drop down

Registration Form Country – Sates (add new country & state list here)

Use Single line fields and Drop down fields to design the forms. Leave the default “Option1, Option2, Option3” in the drop down fields. We will be dealing with them shortly at Deluge script.
Donot use pick list/ lookup field
Question:-
What happens when you use a look-up field?
Answer:- It will show the country names as “n” occurances. Eg:- India, India, India, India, USA ,USA, USA, USA.
We don’t want that.. all we want the list to show is – “India”& “USA”
In other words, we want to avoid any duplicate entries in the drop down list.
Form:- Country_States
This form is used to “collect” the country name & state name. So there is absolutely no scripting involved. Do take a look at the Country States View in the DEMO link
Form:- Registration Form
You can have as many fields as you want. Since this is a tutorial post, I am limiting the fields to Name, Country & State
In the demo, you will notice that, “Country” does not have duplicates & “State” list changes dynamically based on the country name.
The Deluge Script involved.

On Registration Form — > > on Load.
//——–THIS POPULATES THE COUNTRY LIST WITH UNIQUE VALUES——–
Country_list = List();
Cntry = Country_states [(Country is not null)];
Country_list.addall(Cntry.Country.getall());
Country_unique = List();
for each country in Country_list
{
if (!Country_unique.contains(country))
{
Country_unique.add(country);
}
}
for each Ctry in Country_unique
{
County:ui.add(Ctry); //USE CLIENT FUNCTION — ADD ITEM
}
CODE YOU CAN FIND THIS AT THIS LINE OF CODE MEANS
Country_list = List(); LIST MANIPULATION (LM) – CREATE LIST
Cntry = Country_states [(Country is not null)]; DATA ACCESS – FETCH RECORDS collect the rows where state is not null in Country_States_view
Country_list.addall(Cntry.Country.getall()); LM- ADD ALL
Country_list=List(); LM – CREATE LIST
for each country in Country_list LM – FOR EACH ELEMENT
<expression> = country
if (!Country_unique.contains(country)) IF CONDITION You can otherwise Type —> country_unique.contains ( country) is false
Checks if the <expression> value is present ( true) or not ( false)
Country_unique.add(country); LM – ADD ITEM If false, then the value is added to the list — now, you have a unique list
for each Ctry in Country_unique LM – FOR EACH ELEMENT
<expression> = ctry
County:ui.add(Ctry); CLIENT FUNCTION – ADD ITEM Now, each list item is added to your drop down box
On Registration form – > Country Drop down – > User Input
//——THIS POPULATES THE ~~STATES~~ OF THE SELECTED COUNTRY———–
States_list = List();
States_rec = Country_states [Country == input.County];
States_list.addall(States_rec.State.getall());
for each State in States_list
{
State:ui.add(input.State);
}
CODE YOU CAN FIND THIS AT THIS LINE OF CODE MEANS
States_list = List(); LM – CREATE LIST
States_rec = Country_states [Country == input.County]; DATA ACCESS – FETCH RECORDS
States_list.addall(States_rec.State.getall()); LM – ADD ALL Exactly similar to Above pic – Enlarge and see. Be sure to get the state names & check the box for return field values as list
for each State in States_list LM – FOR EACH ELEMENT
<expression> = State
State:ui.add(input.State); CLIENT FUNCTION – ADD ITEM Select the state-drop down list — You will see this list getting popupated based on country name

UPDATE: Oct 2011
After the introduction of Aggregate Records, by ZC displaying unique list got even simpler.
If you found this post to be of some use, please spare a moment to drop a comment.
Your appreciation is my motivation
What is Zoho Creator | The Basics| Design & Share Custom Forms |Using prevalidated Form Fields | Statless Forms |

Zoho Creator Tutorial – Stateless Forms ( Use multiple forms to update a single table)

What is Zoho Creator | The Basics| Design & Share Custom Forms |Using prevalidated Form Fields | Statless Forms |

With the basics in place, I guess, now its time for us to look into some of the advanced features that you can implement within Zoho Creator application.i.e you can come up with more customizations based on your requirements. This will be a combination of form’s design & a little more Deluge script that usual.

The Assignment :-
Application Name :- Event Management
Forms used :

  1. Master Form _Event Management (Stores data in Master View)
  2. Event Details Form (Stateless Form)
  3. Contact Details Form (Stateless Form)

Click to View Demo

This Event Management Application has the details of a particular event & the contact info of the person who is responsible for this event. I hope you would remember me saying in my earlier posts that, by default, Zoho Creator stores the data entered into the forms in tables, called as Views.

However, Zoho Creator has another set of forms called the Stateless Forms. i.e. the data entered within these forms, will not be saved. ( — what the heck! , what is the purpose of having a form that does not save data — , Hey! Friend, hold your horses. You will soon find out.)

As the name suggests, anything entered into the master form will be stored in its View. Stateless forms merely pulls the data from the master form & displays it for you to edit & confirm the edits. After doing the edits, when you go back to the main form’s View, you will notice that the edits have been implemented in the master-view as well. Sample Application here

The fields we will be using will be as follows
Master Form’s details
This is a regular form, Created the normal way. Forgot,see here

Event_Contact_ID*
Contact_Name – This is a required field
Contact_email
Contact_Phone
Event_Name – This is a required field
Event_Venue
Event_Date

Stateless Form (Stateless forms are those, whose data are not stored in Zoho Creator.)

It is a single choice that eventually decides if a form is stateless or not.

Form Fields :-

Event Details Form (Stateless Form)

Event_Contact_ID* — > This will be a look-up field.
Event_Name
Event_Venue
Event_Date

Contact Form (Stateless Form)

Event_Contact_ID –> This will be a look up field
Contact_Name
Contact_email
Contact_Phone

Using the look up field to “show data from other forms”

Remember to include the “SUBMIT” button in your stateless forms

The Tricky part – Deluge Scripting
Master form :-

The EventContact_ID* is the most important field, because, this links all the 3 forms in this application. Hence this has to be unique. We will be generating this UniqueID using deluge script.That means, the user is not allowed to enter anything in this field. Which in turn means, go back to your Master form – Edit the field for Event Contact ID , and say – Hide this field to others. ( of course, “you” will still see it).

Deluge Script to generate the Event Contact ID.

Master Details Form –> On Add –> On Success –> Set Variable

Don’t forget to save the script.

Now run your application & enter some data into the master form.
Go to Master view and cross verify if the data is getting saved along with the auto-generated “Event Contact ID”

Verify your “Lookup field” in “Event details form” & “Contact details form”.
If you had set up the look up field for “Event Contact ID” correctly (in the stateless forms), you should be able to see all od the Event Contact ID’s in this drop down list. Nothing will happen yet, just run both forms & see if the values are shown in live mode.

Deluge script to “Call the data” from the master view.

Up until now, you had been using the “Set Variable” in the script. Now, in order to “call the data”, we will be using “Fetch Records” feature. So what happens with this option. . .

You “Fetch Record – data “ from a certain View & Store it in a variable. This variable is now becomes a “Collection-variable” , (User Defined collection, to be more precise) ie .. Collection of data from field 1, field 2, field 3.. So on and so forth.


Question:- when to fetch the record – data ?
Answer :- After the user selects the value from the “look up field”
Stateless Form (Event Details / Contact Details forms ) —> EventContactID (Lookup field)– >On User Input –>Drag drop “Fetch Records”—>Edit


Now that you have “Fetched the record data”, its time to show them in the form. Use Set variable to achieve this.

input.EventName = RecData.EventName;
input.EventVenue = RecData.EventVenue;
input.EventDate = RecData.EventDate;

Repeat the same exersise at Contact Details form

Contact Details Form –> Event Contact ID (Lookup field)–>User input–>
RecData = MasterDetails_EventManagement [EventContact_ID == input.EventContact_ID];

input.ContactName = RecData.ContactName;
input.ContactPhone = RecData.ContactPhone;
input.Contactemail = RecData.Contactemail;

Deluge script to rewrite the entry in the master view ( table)

Now, you should be able to see relevant records in the stateless form based on the value from the Event Contact ID list. Next step would be to edit other details & Submit the (Stateless) form. This should inturn update the details in the master view.

Question:- when to update the record in master view
Answer :- After the submit button is clicked.

Deluge Script code will be :-

Stateless Form ( Event details / Contact details)–> Submit Button –> On Click

RecData = MasterDetails_EventManagement [EventContact_ID == input.EventContact_ID]; //Use Fetch Records , to call the record data

RecData.ContactName = input.ContactName; //For these, use Update Records
RecData.ContactPhone = input.ContactPhone;
RecData.Contactemail = input.Contactemail;
Reload;

Repeat the same excersie in Contact Details Form ( Stateless Form)

Submit Button –> OnClick

RecData = MasterDetails_EventManagement [EventContact_ID == input.EventContact_ID]; //Use Fetch Records , to call the record data
RecData.ContactName = input.ContactName; // use Update Records
RecData.ContactPhone = input.ContactPhone;
RecData.Contactemail = input.Contactemail;
Reload;

Run the application & let me know if you are able to update the master field from the stateless forms. Not happening.. Feel free to drop a word to me. We will figure it out together. Chao =;
Your appreciation is my motivation

What is Zoho Creator | The Basics| Design & Share Custom Forms |Using prevalidated Form Fields | Statless Forms |

Zoho Creator Tutorial – Part 5 Introducing Deluge Script

What is Zoho Creator | The Basics| Design & Share Custom Forms |Using prevalidated Form Fields | | Deluge Script – Basics

Now that you are familiar with the basics of zoho creator, lets dig our hands into their deluge scripting. During the time when we were working on my Visual Basic application & Java applets, each one of us would have our own way of locating a specific piece of code that we might want to use in our application.

However, with zoho creator’s deluge script, it doesn’t mater a even haven’t programmed anything beyond your TV for the various channels. Because, they have made programming as simple as drag and drop. How,..?. Read along.

Know where to write the code.

As of now, lets concentrate on the SCRIPT –> FORMS
As we move on to views & Functions, we will be looking at other tabs
You can use the drop down arrow to choose any form within your application.

As we developing our guest book, we will open the Guest Bool – FORM in the script tab. After this you should be seeing this

Here, the script does what it exactly says just there. For our application’s sake, let us Add code to AUTOMATICALLY ADD THE DATE within the date field , so that the users dont have to type / select the date. Further, it would also help to know who visited when.I have already added the code in FORM –> LOAD , which is why you see a green dot ín the above pic.

What to write / How to write ‘code’ ?
(A) You might want to say “When the form loads”

— Translated, you will have to write the code on Form –> On Add –> On Load.
— If you clicked in the same order, you should be seeing this. Use the prev image and the one below to locate

(B) You might want to say “ Add todays date automatically ”
— Translating , this would mean something like this
i.Set the Date-Field
ii.To Todays Date

— So you should be doing this

  1. Scroll down a bit and locate the SET VARIABLE. ( Use the image below for guidance
  2. Drag and drop it on to the coding area.
  3. As soon as you drop it, & if you hover the mouse, you should be seeing an EDIT &
  4. DELETE button.

(C).How to set the value for the date field. ?
As soon as you click on Edit, you will be presented with a dialog box
Notice that the declare variable is a drop down variable. – From this select the Date field

As for the actual value , we will be using a variable called the ZOHO – currentdate It is as simple as saying x = 5. You will be telling your application that every time the form loads, just give the current date’s value to my date field. For this, you will have to
1. Select the ZOHO VARIABLES ( Tab)
2. Scroll down a bit .. until you locate the zoho.current date.
3. Click DONE – & you will see this

Wait !!! — The code is not saved yet, It is only generated – So you will have to scroll down and click SAVE SCRIPT at the right bottom corner You will see a green band that says, Script modified.
Now you are ready to go.

Access your application – psst !! … Use the Acess thisApplication Link at the top.
Do you see the date automatically coming up in the date field … ? Great .. You have successfully Coded your application

Now, I have a practice assignment for you. After the form loads & zoho’s current date is performed, disable the date field.
Now that every step has been demonstrated with screen shots, I shall be providing only guidelines. You will have to look for them in the order specified. It is just that…I am feeling lazy to do the screen shots again ..

How to do this ?: –
Form –> On Load –> Drag and drop –> Disable field –> Select Disable – option –> select date field –> Done
Save Script

How to check this ? –> Acess the application — > You should not be able to change the date manually.

Your appreciation is my motivation

What is Zoho Creator | The Basics| Design & Share Custom Forms |Using prevalidated Form Fields | | Deluge Script – Basics